
The Ultimate Developer’s Guide to Google Identity: Secure Authentication, OAuth 2.0, and Beyond
Google Identity: Let’s be honest for a second: nobody likes creating a new account.
As a user, the friction of typing in an email, creating a password that requires a capital letter, a number, and a hieroglyph, and then verifying it via a link sent to your inbox is exhausting. As a developer or product owner, you know that every second of friction is a potential customer lost. This is the “account abandonment” problem, and it is the silent killer of conversion rates.
Enter Google Identity.
If you’ve been looking at the Google Developer documentation lately (specifically the screenshots provided above), you’ve seen a massive overhaul in how Google presents its identity services. It’s no longer just about “logging in.” It’s about a complete ecosystem of security, growth, and user trust.
In this comprehensive guide, we are going to walk through everything you see in the Google Identity dashboard. We will break down how to implement “Sign in with Google,” how to navigate the terrifying world of OAuth 2.0 verification, and how to future-proof your app with Passkeys. Whether you are building a mobile app for Android or iOS, or a web platform, this is your roadmap.
Part 1: The Big Picture – Secure and Grow
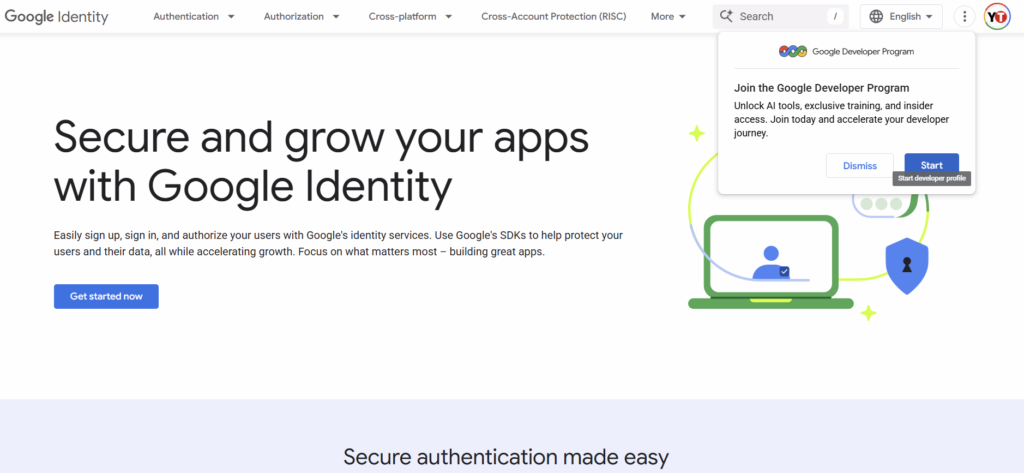
Looking at the main landing page (Image 1), the headline is clear: “Secure and grow your apps with Google Identity.”
This isn’t just marketing fluff. Security and growth are actually the same thing in modern app development. If your users don’t trust you with their data, they won’t sign up. If the sign-up process is hard, they won’t stay.
The Value Proposition
The subtext on the main page highlights the core promise: “Easily sign up, sign in, and authorize your users with Google’s identity services.”
Here is why you should care about this specific suite of tools:
- Trust: Users trust Google. If they see the Google “G” logo, they know their data is likely safe.
- Convenience: “Single tap” sign-up (as seen in Image 2) eliminates the need for users to remember yet another password.
- Protection: Google’s SDKs help protect user data. You aren’t storing passwords anymore, which means you aren’t a target for password database breaches.
The Google Developer Program
Notice the popup in the top right of Image 1? “Join the Google Developer Program.”
It mentions unlocking AI tools, exclusive training, and insider access. If you are serious about building with Google Identity, you should click “Start.” It accelerates your developer journey by giving you access to beta features and better support channels. It’s the first step in moving from a hobbyist coder to a professional ecosystem partner.
Part 2: Building the Journey – “Sign in with Google”
Let’s click on the Authentication tab and look at Sign in with Google (Image 2). This is the bread and butter of the platform.
The page headline reads: “Build seamless identity journeys with Sign in with Google.”
Why “Seamless” Matters
The text explains that this is a convenient way for users to sign up and into apps with a single tap.
- No separate credentials: You don’t manage the password hashing.
- No complex forms: You get the name and email instantly.
- No forgotten passwords: Support tickets for “I forgot my password” drop to near zero.
The Conversion Rate Boost
The documentation explicitly states: “With just a few lines of code, increase your conversion rates, reduce account abandonment, and enjoy happier users.”
This is statistically proven. When you offer a social login option—specifically Google, which has billions of active accounts—you remove the biggest barrier to entry.
Platform Support (The Codelabs)
Look at the sidebar in Image 2 under Codelabs. Google provides specific guides for:
- Sign in with Google for Android: Using the latest Identity Services API.
- Sign in with Google button for Web: The classic button integration.
- One Tap prompt for Web: This is the magic UX. It pops up in the corner of the browser, asking “Sign in as [Name]?” without the user leaving the page.
- Sign in with Google for iOS: For your Apple ecosystem users.
Pro Tip: If you are building a web app, prioritize the One Tap integration. It has the highest conversion rate because it requires the least amount of clicks.
Part 3: The Scary Part – OAuth 2.0 and App Verification
Now we get to the part that makes most developers sweat. Look at Image 3. We are now in the App Verification tab, specifically looking at “Comply with OAuth 2.0 policies.”
If you have ever tried to use Google APIs (like reading a user’s calendar or accessing their Drive) and seen a big red screen saying “Google hasn’t verified this app,” you know why this section exists.
Google is cracking down on bad actors. They want to ensure that if an app asks for permission to access sensitive data, the app is legitimate. This is called Brand Verification.
The Checklist for Compliance
The “On this page” menu in Image 3 gives us the exact roadmap to avoiding that scary red warning screen. Let’s break down these four critical steps.
1. Use separate projects for testing and production
This is a fundamental best practice.
- The Mistake: Many devs use their “Sandbox” project to test login flows with real user data, or they leave their production app in “Testing” mode.
- The Fix: Create a project in Google Cloud Console specifically for
Dev/Stagingand another forProduction. - Why? When you submit for verification, Google reviewers need to see a polished, production-ready app. If they see “Test App v0.1” with broken links, they will reject you. Keep your messy experiments in the testing project.
2. Maintain a list of relevant contacts for the project
Google needs to know who to yell at if something goes wrong.
- You need to list a Privacy Policy URL and a Terms of Service URL.
- You need a valid email address for the developer.
- Crucial: Ensure these emails are monitored. If Google sends a compliance warning and you miss it, your app’s access to Google APIs can be suspended.
3. Accurately represent your identity
This is about Branding Guidelines (also listed in the sidebar of Image 2).
- Your app name in the OAuth consent screen must match your app store listing or website name.
- Your logo must be high quality.
- The “Homework” Screen: When a user logs in, they see a screen that says “[App Name] wants to access your Google Account.” If your app name is “SuperCoolApp” but the OAuth screen says “Project 84729,” users will panic and click “Cancel.” Consistency builds trust.
4. Only request scopes that you need
This is the most common reason for rejection.
- Scope: A permission request (e.g.,
email,profile,calendar.readonly). - The Rule: Least Privilege. If your app is a flashlight app, do not ask for
contactsscope. - Sensitive vs. Restricted: Google categorizes scopes.
emailis standard.Driveaccess is sensitive.Gmailfull access is restricted. - The Fix: Audit your code. Remove any scopes you aren’t actively using. If you ask for 5 permissions but only use 2, Google will reject your verification request.
Part 4: Navigating the Authentication Menu
Let’s look at Image 4. This shows the dropdown for the Authentication tab. It reveals the breadth of what Google Identity offers beyond just a simple login button.
1. Sign In with Google
We covered this. It’s the core identity provider.
2. App Verification
We covered this. It’s the compliance layer.
3. Passkeys (The Future)
This is the most exciting item on the list. Passkeys are the industry’s answer to the password problem.
- What are they? Instead of a password, you use your device’s biometric (FaceID, Fingerprint) or a PIN to sign in. The “key” is stored securely on your phone (in the Secure Enclave or Titan chip).
- How it works with Google: Google acts as the passkey provider. You can sign in to a website using your Android phone’s fingerprint, even if you are on a Windows PC.
- Why implement it? It is phishing-resistant. A hacker can steal a password; they cannot steal the biometric key stored on your user’s physical device. Google is pushing this hard, and early adopters will see better security metrics.
4. Credential Sharing
This is a newer, more advanced feature. It allows for secure sharing of credentials between apps.
- Use Case: Imagine a user logs into your main website. They download your mobile app. Credential sharing (often tied to Android’s credential manager) allows the app to silently sign the user in using the credentials saved on the device, without them typing anything. It creates a “magic” continuity between platforms.
5. Samples
Always check the samples. Documentation is great, but copy-pasteable code is better. The samples usually show the “Happy Path”—the ideal implementation.
Part 5: Authorization – Beyond Just Logging In
Now look at Image 5. We are looking at the Authorization tab.
There is a distinct difference between Authentication and Authorization, and developers often confuse them.
- Authentication (AuthN): “Who are you?” (e.g., You are John Doe, john@gmail.com).
- Authorization (AuthZ): “What are you allowed to do?” (e.g., You can read John’s calendar, but you cannot delete his emails).
The Authorization menu in Image 5 lists:
- Account Authorization: Managing permissions.
- App verification to use Google Authorization APIs: Similar to the auth verification, but specifically for apps that act on behalf of the user.
- Account Linking: This is huge for smart home devices and third-party integrations.
Deep Dive: Account Linking
If you are building a service that connects to a Google Account (like “Sign in with Google to connect your Spotify” or a Smart Home action), you use Account Linking.
- This uses OAuth 2.0 flows to link a user’s account on your system with their Google Account.
- Once linked, Google Assistant or other Google services can interact with your app on the user’s behalf.
- Requirement: This requires strict adherence to the OAuth 2.0 policies we discussed in Part 3. You are asking for deep access, so Google will scrutinize your security heavily.
Part 6: The “Secure Authentication Made Easy” Section
Scroll down to the bottom of Image 1. You see the header: “Secure authentication made easy.”
This section usually details the specific SDKs and libraries available.
- Google Identity Services (GIS): The modern JavaScript library for the web. It replaces the old
gapi.auth2which is deprecated. If you are still using the old library, stop. It is being phased out. Move to GIS. - Android Credentials Manager: The unified API for Android 14+ that handles passwords, passkeys, and federated login (Google/Apple) in one single prompt.
Cross-Account Protection (RISC)
In the top navigation bar (Image 1 and 3), you see Cross-Account Protection (RISC).
- What is it? RISC stands for Risk Incident Service & Sharing.
- How it works: If Google detects that a user’s account has been compromised (e.g., they fell for a phishing scam), Google sends a secure token to your app (via a webhook).
- Your Action: Your app receives this signal and can automatically lock the user’s account or force a re-login.
- Why use it? It makes your app enterprise-grade. Big companies love this because it protects their employees even when they use third-party tools.
Part 7: A Step-by-Step Implementation Strategy
So, you’ve read the docs. You’ve seen the screenshots. How do you actually execute this? Here is a 5-step strategy to integrate Google Identity successfully.
Step 1: The Setup (Google Cloud Console)
- Go to the Google Cloud Console.
- Create a new project (Name it clearly, e.g., “MyApp Production”).
- Navigate to APIs & Services > Credentials.
- Configure the OAuth Consent Screen. This is where you fill in the “App Name,” “User Support Email,” and “Developer Contact Information” mentioned in Image 3.
- Crucial: Add your domain to the “Authorized Domains” list. If you are testing on
localhost, add it here, but remember to change it for production.
Step 2: Choose Your Flow
- Web: Use the Google Identity Services (GIS) library. Implement the “One Tap” dialog first. It’s the highest converting. Add the standard “Sign in with Google” button as a fallback.
- Mobile: Use the Credential Manager API (Android) or GIDSignIn (iOS). Ensure you handle the token exchange securely on your backend.
Step 3: Backend Verification (The Security Layer)
- Never trust the client. Just because the JavaScript says “User is logged in” doesn’t mean you should trust it.
- The client receives an ID Token (a JWT – JSON Web Token).
- Send this token to your backend server.
- Your server must verify the token’s signature using Google’s public keys.
- Only after the server verifies the token should you create a session or issue your own app’s JWT.
Step 4: The Verification Push
Once your app is working and you are ready for real users:
- Go to the OAuth Consent Screen settings.
- Change the “Publishing status” from Testing to Production.
- If you are requesting sensitive scopes (like reading email content or Drive files), you must submit your app for Verification.
- Follow the checklist in Image 3: Ensure your privacy policy is live, your logo is clear, and your demo video (if requested) shows exactly how the data is used.
Step 5: Monitor and Maintain
- Check the Google Cloud Console Dashboard regularly.
- Look for “Quota exceeded” errors.
- Watch out for “Invalid Client” errors (usually means your redirect URI doesn’t match).
- Keep your “Relevant Contacts” email updated.
Part 8: Common Pitfalls to Avoid
Based on the documentation structure and common developer errors, here are the traps you need to avoid.
1. The “Unverified App” Screen
If you see the red screen warning users that your app is unverified, do not ignore it.
- Users will click “Advanced” -> “Go to App” only if they are desperate. Most will just leave.
- Fix: If you only need basic profile info (email/name), you usually don’t need full verification, just the consent screen setup. If you need more, submit for verification immediately.
2. Mixing up ID Tokens and Access Tokens
- ID Token: Contains user info (Name, Email, Picture). Used for Authentication.
- Access Token: Used to call Google APIs (e.g., “Get my Calendar events”). Used for Authorization.
- Mistake: Trying to use an ID Token to call the Calendar API. It won’t work. You need to request the specific scope (
calendar.readonly) to get an Access Token.
3. Ignoring Mobile Web UX
On mobile browsers, the “One Tap” prompt can sometimes be blocked by pop-up blockers or behave weirdly with iframes.
- Fix: Always have a fallback button. “Sign in with Google” button should always be visible if the automatic prompt fails to load.
4. Hardcoding Client IDs
Never hardcode your Google Client ID in your frontend code if you can avoid it, or at least restrict it.
- In Google Cloud Console, you can restrict a Client ID to specific HTTP referrers (domains).
- If someone steals your Client ID and puts it on their site, the restriction prevents them from using it to impersonate your app.
Part 9: The Future – Passkeys and Beyond
We touched on Passkeys in the menu (Image 4), but they deserve a spotlight because they are changing the industry.
Google is a founding member of the FIDO Alliance. They are pushing for a “passwordless” future.
- The User Experience: Instead of typing
Password123!, the user clicks “Sign in,” their phone asks for a fingerprint, and they are in. - The Developer Experience: You implement the WebAuthn API or use Google’s Credential Manager.
- The Benefit: Zero password resets. Zero credential stuffing attacks.
If you are starting a new project today, design your database to support Passkeys. Don’t just rely on the Google ID Token. Store the public key credentials if possible, or rely on the session management that Google provides.
Conclusion: Focus on What Matters
Going back to the main headline in Image 1: “Focus on what matters most – building great apps.”
That is the ultimate promise of Google Identity. By offloading the complex, risky, and frustrating parts of identity management (passwords, 2FA, session handling, OAuth compliance) to Google, you free up your brain to work on your actual product.
You don’t need to be a security expert to implement secure login anymore. You just need to follow the guide:
- Sign In: Make it one tap.
- Verify: Be honest about your data usage.
- Authorize: Ask for the minimum permissions necessary.
- Innovate: Look into Passkeys.
The screenshots provided show a mature, robust, and slightly complex ecosystem. It can feel overwhelming with tabs for “RISC,” “Credential Sharing,” and “OAuth Policies.” But take it one step at a time. Start with the basic “Sign in with Google” button. Get that working. Then, as your app grows and you need more data, tackle the Verification and Authorization tabs.
Secure authentication isn’t just a feature; it’s the foundation of your relationship with your user. Build it right with Google Identity, and you’ll see your growth accelerate.
Ready to start? Head over to the Google Cloud Console, create your project, and let’s build something secure.