How to Create Your Own AI Character on Meta AI Studio
A complete beginner-to-pro guide for creators, bloggers, and digital marketers who want to build a branded AI persona — for free.
What Is Meta AI Studio — And Why Does It Matter?
Meta AI Studio is Meta’s creator-facing platform that allows individuals, influencers, and businesses to build their own custom AI characters — also called AI personas or AI characters — that can interact with followers and fans directly inside Instagram, Facebook Messenger, and WhatsApp.
Think of it as having a 24/7 digital assistant that speaks in your voice, represents your brand, and handles routine questions and coaching sessions with your audience — all without you lifting a finger after the initial setup.
Launched as part of Meta’s broader push into generative AI, AI Studio democratizes what used to be an expensive, technically complex undertaking. Previously, building a branded chatbot required API integrations, developer resources, and ongoing maintenance. With Meta AI Studio, you do it entirely through a visual, point-and-click interface — and it’s free.
For content creators, the implications are enormous. Whether you run a tech blog, a fitness Instagram, a finance newsletter, or a cooking channel, your AI character can serve as the front line of audience engagement — offering personalized responses based on the knowledge you’ve given it.
As of mid-2026, Meta AI Studio is available to creators with a Facebook or Instagram account in the United States. Availability continues to expand globally. You can access it at ai.meta.com/studio or directly through the Meta Business Suite.
Who Should Build an AI Character on Meta AI Studio?
The honest answer? Almost any creator with a defined niche and an audience to serve. But let’s get more specific. Here are the use cases where a custom AI character delivers the most value:
Help readers find the right articles, get writing tips, or learn your content strategy — automatically.
Offer on-demand SEO audits, keyword tips, and strategy guidance without one-on-one calls.
Educate followers on budgeting, investing basics, or affiliate products in a compliant, responsible way.
Give workout plans, answer nutrition questions, and keep followers engaged between coaching sessions.
Answer product questions, suggest items, and handle pre-sales conversations at scale.
Provide study support, answer curriculum questions, and nurture prospective students.
The example we’ll follow throughout this tutorial is SEO Coach Pro — an AI character built by a creator named fintechsuraj, designed to help tech bloggers and social media influencers grow their online presence through keyword research, technical SEO, affiliate marketing, and schema optimization.
Before You Start: What You Actually Need
Before you log into Meta AI Studio, spend 20–30 minutes doing the thinking work. Your AI character is only as good as the clarity you bring to its design. Here’s what you need to nail down first:
Pre-Launch Checklist
- A verified Facebook or Instagram account in the US (or supported region)
- A clear niche — be specific (“SEO for tech bloggers” beats just “digital marketing”)
- Your AI’s purpose stated in one sentence: “My AI helps [audience] achieve [outcome] by [method]”
- A list of 10–15 frequently asked questions your audience already asks you
- 2–3 paragraphs describing your expertise, approach, and personality
- A sense of tone — professional, casual, encouraging, witty?
- An idea of what you want your avatar to look like (AI-generated options are provided)
Having these elements ready before you open the Studio will make the entire creation process much smoother and produce a far more effective AI character from day one.
Step 1 — Browse AI Ideas to Spark Your Concept
When you first land on Meta AI Studio, you’re greeted with a “Browse AI Ideas” section. This is essentially a gallery of concept templates and inspiration cards — showing you what other creators have built and what categories are popular.
Finding Your Starting Point
Don’t just click the first idea that seems relevant. Browse through several categories. You’ll notice that while the platform prepares your initial details (you’ll see a loading state that says “Preparing initial details…”), it’s already analyzing trends and matching concepts to what’s popular.
The goal of this step is inspiration and validation. If you already have your niche locked in (like our example creator did with SEO), use this moment to confirm that no one else has built an identical character — and to identify gaps you can fill better.
Ask yourself: What do people in my niche search for at 11pm when no human expert is available? That’s your AI’s sweet spot.
- A card UI showing “Browse AI ideas” as the header
- A loading card showing “Preparing initial details…” with a sparkle animation
- Category cards for different niches: fitness, finance, lifestyle, tech, etc.
- Creator attribution shown as “AI by [username]” on each card
The most successful AI characters on Meta AI Studio aren’t broad — they’re razor-specific. “SEO Coach Pro for tech bloggers” outperforms “Marketing Helper” every time because specificity builds trust and attracts the exact audience you want.
Step 2 — Define Your AI’s Purpose and Knowledge Base
This is the most important step in the entire process — and unfortunately, the one most creators rush through. Once the Studio generates your initial setup, you’ll be taken to the main editing dashboard where you’ll find two primary sections: Knowledge and Introduction and Capabilities.
The Knowledge Tab
The Knowledge tab is where you define “What your AI knows.” According to the platform, you should fill in text in each field and aim to be as descriptive as possible. This is where the real work happens.
For SEO Coach Pro, the creator filled in a comprehensive description that spans nearly 500 out of the allowed 2,000 characters in the description field. Here’s what made it effective:
How to Write a Powerful AI Description
Lead with expertise: State clearly what your AI specializes in. “With expertise in keyword research, technical SEO, and affiliate marketing” signals immediately to users that this isn’t a generic chatbot.
Name your target audience: “I help tech bloggers and social media influencers” — this is critical. Users should self-identify and feel like the AI was built specifically for them.
Define your approach: “My approach is professional, yet encouraging and empathetic, ensuring you feel supported every step of the way.” This sets the emotional tone of every interaction.
List specific capabilities: “From schema and sitemaps to converting followers into sales” — concrete specifics build credibility and help users know exactly what to ask.
End with a rallying call: “Let’s grow your tech blog and social media profiles together!” creates a sense of partnership and momentum.
The Instructions field (104 out of 2,000 characters in the example) is where you tell the AI how to behave, not just what it knows. Think of this as the personality and behavioral rulebook.
Many first-time creators fill in the description but leave instructions vague. This leads to AI responses that feel generic or off-brand. Be explicit: “Always ask clarifying questions before giving advice,” “Keep responses under 150 words unless the user asks for detail,” “Use a friendly, coach-like tone — never condescending.”
Step 3 — Add the Name, Tagline, and Avatar
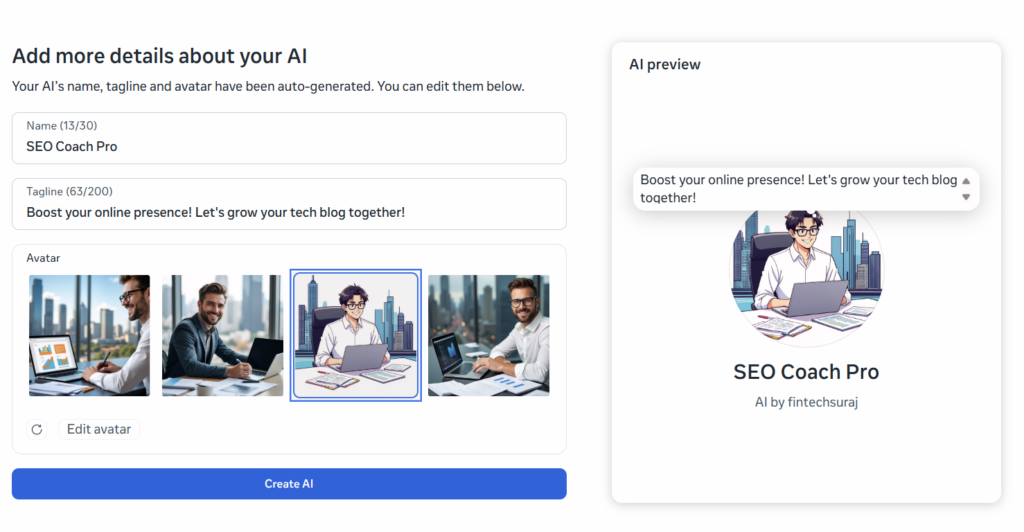
After clicking through from the knowledge setup (or at the very beginning if you start fresh), you’ll hit the “Add more details about your AI” screen. This is the branding step — and it matters more than you might think, because it’s the first thing users see when they discover your AI character in the directory.
- Name field — 13/30 characters used (e.g., “SEO Coach Pro”)
- Tagline field — 63/200 characters used (e.g., “Boost your online presence! Let’s grow your tech blog together!”)
- Avatar section — 4 AI-generated image options displayed in a horizontal carousel
- Edit avatar button — allows regeneration of avatar options
- AI preview card — live preview on the right side showing how your AI will appear to users
- Create AI button — blue CTA at the bottom
Naming Your AI Character
A great AI name is short, memorable, and descriptive of function. Notice how “SEO Coach Pro” achieves all three: it tells you the domain (SEO), the relationship (Coach), and the positioning (Pro — implying expertise). You get 30 characters to work with, so use them wisely.
Avoid generic names like “AI Assistant” or “Helper Bot.” Instead, lean into your brand or niche identity. Some strong naming frameworks to consider:
[Skill] + [Role]: “Copy Coach,” “Finance Mentor,” “Fitness Guide Pro”
[Adjective] + [Domain] + [Title]: “Smart SEO Advisor,” “Bold Brand Strategist”
Your name + [expertise]: “Alex’s SEO Lab,” “Jordan’s Growth Hub”
Writing Your Tagline
The tagline is the elevator pitch for your AI character. You have 200 characters — use them to communicate both the benefit and the invitation. Notice how “Boost your online presence! Let’s grow your tech blog together!” does three things at once: it names a concrete outcome (boosted presence), it specifies the audience (tech bloggers), and it creates a collaborative, friendly framing (“Let’s grow… together”).
Avoid vague taglines like “Your AI assistant for everything digital.” Be specific. Be inviting. Be outcome-focused.
Choosing or Customizing Your Avatar
Meta AI Studio automatically generates four avatar options based on your AI’s described purpose. In the SEO Coach Pro example, the creator chose an illustrated, anime-style character — a professional in glasses working on a laptop against a city skyline background. This was a smart choice for several reasons:
- It’s visually distinct from the photorealistic options, making it stand out in a directory
- The illustrated style feels approachable and friendly rather than corporate
- The cityscape background reinforces a professional, tech-forward identity
- Glasses subtly signal intelligence and expertise — great for a coaching persona
If none of the four auto-generated options feel right, click Edit avatar to regenerate with a new set. You can do this multiple times at no cost.
Research in human-computer interaction consistently shows that users trust AI personas with human-like (but not hyperrealistic) representations more than abstract or purely robotic avatars. An illustrated human character that feels warm and approachable will outperform a geometric logo every time — especially for coaching, education, and support use cases.
Step 4 — Build Out the Introduction and Capabilities
Switch to the Introduction and capabilities tab in the Studio. This is where you define how your AI greets users and introduces itself — essentially scripting its opening move in every conversation.
Think about the very first message a new user will see when they chat with your AI. It should immediately establish three things: who the AI is, what it can help with, and how to get started. A weak introduction wastes valuable first impressions. A strong one pulls users into engagement immediately.
A Proven Introduction Framework
Line 1 — Who I am: “Hi! I’m SEO Coach Pro, your dedicated guide to growing your tech blog and online presence.”
Line 2 — What I can do: “I specialize in keyword research, technical SEO, affiliate marketing strategies, and helping you convert your social media followers into real revenue.”
Line 3 — Invitation to act: “To get started, tell me: What’s your biggest challenge right now — getting traffic, ranking higher, or monetizing your content?”
Notice how line 3 ends with a specific question. This is critical — it gives users a clear on-ramp and dramatically increases the chance they’ll actually engage rather than bouncing.
In the Capabilities section, be as specific as possible about what topics the AI can handle. This helps Meta’s systems categorize your AI correctly — and it helps users self-qualify before starting a conversation. For SEO Coach Pro, the capabilities might include: keyword research, on-page SEO, technical audits, content strategy, backlink building, schema markup, sitemap optimization, affiliate marketing, and Instagram/social media growth.
Step 5 — Set Instructions and Personality Guardrails
The Instructions field is where you shape how your AI behaves — not just what it knows. Think of this as programming the character’s personality, response style, and ethical guardrails. This is the difference between an AI that feels like talking to a knowledgeable friend versus one that churns out robotic, generic advice.
What to Include in Your Instructions
Tone and personality: Write exactly how you want the AI to communicate. “Always maintain a friendly, encouraging coach-like tone. Be direct with recommendations but never dismissive. Celebrate small wins with the user.”
Response format preferences: “When listing steps, always use numbered lists. Keep responses under 200 words unless the user explicitly asks for a deep dive. Always ask if the user wants you to elaborate.”
Boundaries and limitations: “Don’t make guarantees about rankings or income. If asked about topics outside SEO and social media growth, gently redirect the conversation.” Setting honest limitations actually increases trust — users appreciate an AI that knows its boundaries.
Engagement loops: “End every response with one follow-up question to keep the conversation going. Examples: ‘Want me to elaborate on any of these?’, ‘Which of your pages should we audit first?'”
In the screenshots, we can see the AI responding to a question about Instagram growth with a concise 5-step numbered list, followed by “Want me to elaborate on any of these?” — exactly the kind of structured, actionable, engagement-driving response that great instructions produce.
Step 6 — Run a Response Test Before Publishing
This is the step most creators skip — and it’s a costly mistake. The “Run a response test” feature, visible in the top right of the Studio interface, lets you simulate real conversations with your AI before any user touches it. Treat this like a dress rehearsal.
The 10-Question Test Protocol
Don’t just ask one or two softball questions. Put your AI through its paces. Here’s a testing framework to use:
Core use case questions (4 questions): The most common things your audience actually asks. For SEO Coach Pro, that might be “How do I do keyword research?” or “What are the best SEO plugins for WordPress?”
Edge case questions (3 questions): Things your audience might ask that are slightly off-topic. How does your AI handle “What’s the best camera for YouTube?” when it’s an SEO coach?
Misuse test (2 questions): Ask something totally out of scope — a recipe question, a political opinion. Your AI should gracefully redirect, not go off the rails.
Ambiguous question (1 question): Ask something vague like “Help me grow.” Does the AI ask a clarifying question, or does it guess and give bad advice?
After each test response, evaluate: Is the tone right? Is the length appropriate? Is the information accurate? Does it end with engagement? Revise your instructions until you’re satisfied with at least 8 out of 10 test responses.
As shown in the Studio interface, Meta notes that “To provide more relevant responses, AIs may use information like your interests, location and profile.” Be transparent with your audience about this. Consider mentioning in your AI’s introduction that it may personalize responses based on available profile information.
Step 7 — Publish Your AI and Set Discovery Settings
When you’re ready, click the Publish button in the top right of the Studio. Before you do, you’ll notice the audience setting — the example shows “Everyone” selected, meaning the AI character will be publicly discoverable and searchable across Meta’s platforms.
You also have the option to set visibility to “Only me” during the testing and refinement phase. This is a great practice — save your AI as “Only me” first, test it thoroughly over a few days, then flip to “Everyone” when you’re confident in the experience.
✅ Publishing to Everyone
- AI is discoverable in Meta’s AI directory
- Any Instagram or Facebook user can chat with it
- Drives organic reach and brand awareness
- Builds your authority as a creator in your niche
🔒 Starting with Only Me
- Test without risking poor first impressions
- Refine responses before public launch
- Build confidence in the AI’s behavior
- Upgrade to Everyone when ready
Once you hit Publish (to Everyone), the platform initiates a review process. Don’t be alarmed — this is expected and normal.
Understanding the Review Process
After publishing to Everyone, your AI enters a review queue. The Studio displays a clear message: “Your AI is in review. Your AI will be discoverable and searchable once it is approved. You’ll be notified when it becomes available to everyone.”
A pop-up modal provides additional context: most reviews take place in less than a minute. However, if there’s a policy violation or a complex case, it could take up to two days. You’ll receive a notification when the process is complete.
What Meta Reviews — and How to Pass Easily
Content policies: Your description, instructions, and knowledge base are reviewed for violations of Meta’s community standards. Avoid making medical claims, financial guarantees, or anything that could be considered misleading.
Impersonation: Don’t make your AI character claim to be a real person, celebrity, or brand it isn’t. Your own persona is fine; claiming to be a famous SEO guru is not.
Safety guardrails: The platform checks that your instructions don’t program the AI to produce harmful, discriminatory, or dangerous content.
If your content is straightforward, helpful, and on-topic — like SEO Coach Pro — you’ll almost certainly be approved within minutes.
During the review period, you can still use the “Chat with AI character” button inside the Studio to interact with your creation. You can also continue refining instructions — though as the platform notes, “AI updated. Previous messages won’t apply moving forward” after any updates you make.
Pro Tips to Make Your AI Character Stand Out
Getting approved is step one. Building an AI character that actually grows your brand, drives engagement, and earns real trust from your audience is the ongoing work. Here are the strategies that separate mediocre AI personas from standout ones:
1. Update Your Knowledge Base Regularly
SEO changes. Social media algorithms shift. Affiliate programs come and go. Your AI character’s knowledge base should be a living document. Commit to revisiting and updating it at least once a month. An AI giving outdated advice is worse than no AI at all — it actively damages trust.
2. Promote Your AI Character Everywhere
Don’t just publish and hope for discovery. Add a link to your AI character in your Instagram bio, your blog’s “Start Here” page, your email newsletter, and even your YouTube descriptions. Frame it as a free resource: “Chat with my AI coach anytime — get instant SEO answers at [link].” This gives your audience a compelling reason to engage and keeps them in your ecosystem even when you’re not posting.
3. Use Your AI to Pre-Qualify Leads
If you offer paid services — consulting, courses, affiliate products — your AI can be an incredibly effective lead funnel. Program it to ask qualifying questions and then direct high-intent users toward a specific call-to-action. For example, after discussing a user’s SEO challenges, the AI might say: “Based on what you’ve shared, you might really benefit from a one-on-one audit session. Here’s how to book: [link].” This is automated lead generation running 24/7.
4. Monitor Conversations and Iterate
Meta AI Studio provides visibility into how your AI is performing over time. Look for patterns: What questions come up most? Where does the AI seem to struggle or give weak answers? Use these insights to refine your instructions and knowledge base on an ongoing basis. The creators who win with AI Studio are the ones who treat their AI character as a product that requires continuous iteration — not a one-time setup.
5. Create Content Around Your AI’s Expertise
Here’s a content strategy that works beautifully: take the most common questions your AI receives and turn them into blog posts, Instagram carousels, or YouTube Shorts. You’re already producing valuable answers inside the AI — repurposing them as public content creates a flywheel. Your public content drives people to discover your AI, and your AI’s conversation data tells you what content to create next.
6. Think of Tone as Your Moat
In a world where anyone can build an AI character about SEO or fitness or cooking, the differentiator isn’t the information — it’s the personality. Invest real time in crafting instructions that make your AI feel uniquely like your brand voice. The SEO Coach Pro example does this well: “professional, yet encouraging and empathetic.” That specific tonal combination is a brand identity, not just an instruction. Nail your tone, and you build something that competitors can’t easily copy.
80% of your AI character’s success comes from 20% of your setup: the description, the instructions, and the first message. These three elements determine whether users engage or bounce. Get these right first, then optimize everything else. Run a response test before publishing. Refine your instructions after. Everything else is secondary.
Final Thoughts: Your AI Character is Just the Beginning
What fintechsuraj built with SEO Coach Pro is a perfect illustration of how powerful — and how accessible — Meta AI Studio has become. In a few hours of setup, this creator deployed a professional AI coaching persona that can simultaneously serve hundreds of followers with personalized SEO guidance, 24 hours a day, at zero ongoing cost.
That’s not a small thing. That’s a paradigm shift in how creators can show up for their audiences.
But here’s the honest truth: the creators who will get the most from Meta AI Studio are the ones who bring genuine expertise and genuine personality to their AI character — not the ones who fill in the minimum fields and expect magic. The platform is powerful. The results are proportional to the thought you put in.
So start with clarity. Know your niche. Know your audience. Know the one thing you want your AI to be famous for. Then build it with the care you’d give any important piece of your brand. Because in 2026 and beyond, your AI character is your brand — working harder and longer than you ever could alone.
Now go build yours. The “Browse AI ideas” page is waiting.